Scenes Demo Application Tutorial
In this tutorial, we create an application using the Flipper Zero's SceneManager and ViewDispatcher. My YouTube series also covers using the SceneManager.
The Flipper Zero supports three ways to develop UI (user interface) applications. ViewPort, ViewDispatcher, and SceneManager. This tutorial will focus on using the SceneManager and ViewDispatcher. If you are interested in learning more about ViewPort, please see the ViewPort Tutorial.
If you have more than two pages in your application, you may want to consider using a SceneManager and ViewDispatcher. You can think of a scene as a UI screen with some purpose. Each scene typically uses one module, but multiple scenes may reuse the same module. For example in a sound application, a "volume scene" and a "frequency scene" may both use the same knob module to let the user select the value (but one scene is setting the volume value while the other is setting the frequency). The SceneManager will handle the transition between scenes and uses the ViewDispatcher to handle the transition between views. The Scene Manager is a good way to develop UI applications, where you want to navigate between scenes. Using a Scene Manager helps you to reuse code, handle the transition between scenes, and keeps the logic for each scene separate.
Demo Application Overview
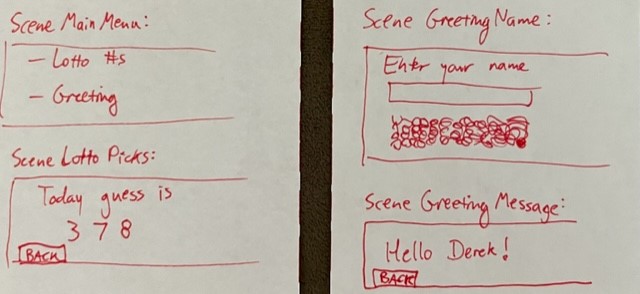
The application will start by displaying a menu with two items.
The first item will be a lottery number generator.
The second item will be a greeting application.
The user will select the item from the menu and the application will display the selected item.
The lottery number generator will display a scene that picks 3 random numbers.
The greeting application will display two scenes. The first scene will ask the user for their name. When the user presses the enter button, the scene will change to a different scene. The second scene will display Hello and the user's name (and a button to go back to the main menu).
Scenes
A scene uses a module to display the user interface on the Flipper Zero. The module for the scene also handles the user input. The scene manager will display the scene and handle the transition between scenes. The scene manager will call the scene's on_enter function when the scene is displayed. The scene manager will call the scene's on_event function when a custom event is invoked. The scene manager will call the scene's on_exit function when the scene is no longer displayed.
Our application will have the following scenes:
- BasicScenesMainMenuScene - The main menu scene.
- BasicScenesLotteryScene - The lottery number generator scene.
- BasicScenesGreetingInputScene - The greeting name input scene.
- BasicScenesGreetingMessageScene - The greeting message scene.
Modules / Views
A module (or more specifically, a module's view) will display the user interface on the Flipper Zero. It will also handle the user input.
Our application will use the following modules:
- submenu - The submenu module (for displaying the main menu)
- widget - The widget module (for displaying the lottery numbers & greeting message)
- text_input - The text input module (for entering the user's name)
We will refer to the above module's view using the following:
- BasicScenesSubmenuView - The submenu's view.
- BasicScenesWidgetView - The widget's view.
- BasicScenesTextInputView - The text_input's view.
Step 1. Install Git and VS Code.
If you have not already installed Git and VS Code, you will need to do so. The following links will take you to the download pages for Git and VS Code.
Step 2. Clone the Flipper Zero firmware.
Clone the Flipper Zero firmware from GitHub. The following command will clone the firmware into a folder named official-firmware. (The below commands may wrap on your screen. You can copy and paste the entire command; there should only be two lines.)
cd <your working directory>
git clone --recursive https://github.com/flipperdevices/flipperzero-firmware.git official-firmware
Replace <your working directory> with the directory where you want to clone the firmware.
Step 3. Run FBT to build the firmware and configure VS Code.
Run the following commands from the root of the firmware folder to build the firmware and configure VS Code. Replace <your working directory> with the directory where you cloned the firmware. In some environments you do not need the "./" at the beginning of the command.
cd <your working directory>
cd official-firmware
./fbt vscode_dist
./fbt updater_package
*** Please follow the steps at FBT VSCode integration before proceeding. ***
Step 4. Create a basic_scenes directory.
After you have followed the steps at FBT VSCode integration, you should have Visual Studio Code open and be in the official-firmware folder.
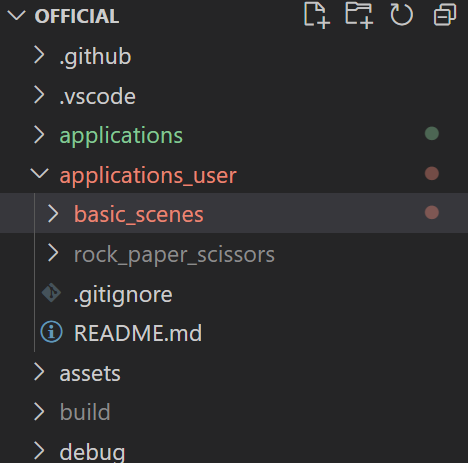
Create a directory named basic_scenes in the applications_user directory. This is where we will store all of the files for our application.
Step 5. Create an icon for the Flipper UI.
Create a basic_scenes.png file. This is the icon that will be displayed when selecting the Flipper app in the Flipper UI. I typically use a 10x10 pixel image with black and white pixels. The image can be any 10x10 image you want.
Step 6. Create an application.fam file.
Create a file named application.fam with the following content:
App(
    appid="Basic_Scenes",
    name="Basic Scenes Demo",
    apptype=FlipperAppType.EXTERNAL,
    entry_point="basic_scenes_app",
    requires=["gui"],
    stack_size=2 * 1024,
    fap_icon="basic_scenes.png",
    fap_category="Misc",
)
- The appid is the name of the application. It must be unique.
- The name is the name that will be displayed in the Flipper UI.
- The apptype is FlipperAppType.EXTERNAL.
- The entry_point is the name of the function that will be called when the application is started.
- The requires is a list of the required services. We will use the gui (graphical user interface) service.
- The stack_size is the size of the stack for the application. I typically start with 2*1024 size.
- The fap_icon is the name of the icon file, which we created in the previous step.
- The fap_category is the category that the application will be displayed in the Flipper UI.
Step 7. Create a basic_scenes.c file with our program entry point.
Create a file named basic_scenes.c with the following content:
#include <furi.h>

int32_t basic_scenes_app(void* p) {
    UNUSED(p);
    furi_delay_ms(5000);
    return 0;
}
furi.h contains the definions for FURI (Flipper Universal Registry Implementation). furi_delay_ms is a function that will delay the application for the specified number of milliseconds. FuriString is a string type that is used by the Flipper Zero firmware.
The basic_scenes_app function will be called when the application is started. We configured this in our application.fam file entry_point parameter in the previous step. The function returns 0 when the application exits.
Step 8. Compile and run the application.
Run the following command from the root of the firmware folder to compile and run the application. Make sure you are not currently running the Flipper UI, qFlipper or lab.flipper.net. In some environments you do not need the "./" at the beginning of the command.
cd <your working directory>
cd official-firmware
./fbt launch_app APPSRC=applications_user/basic_scenes
You should see an hour glass on the Flipper for 5 seconds and then the Flipper UI will return to the Desktop application.
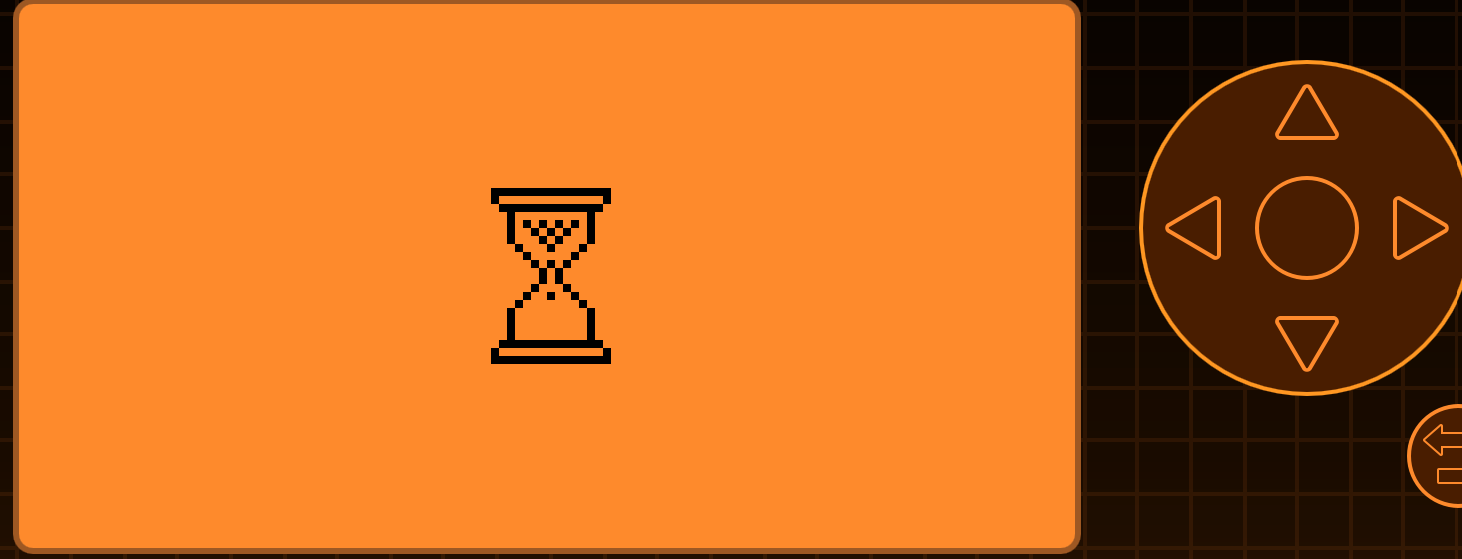
Our code currently does not have any user interface. We will add more code to our application in the next steps.
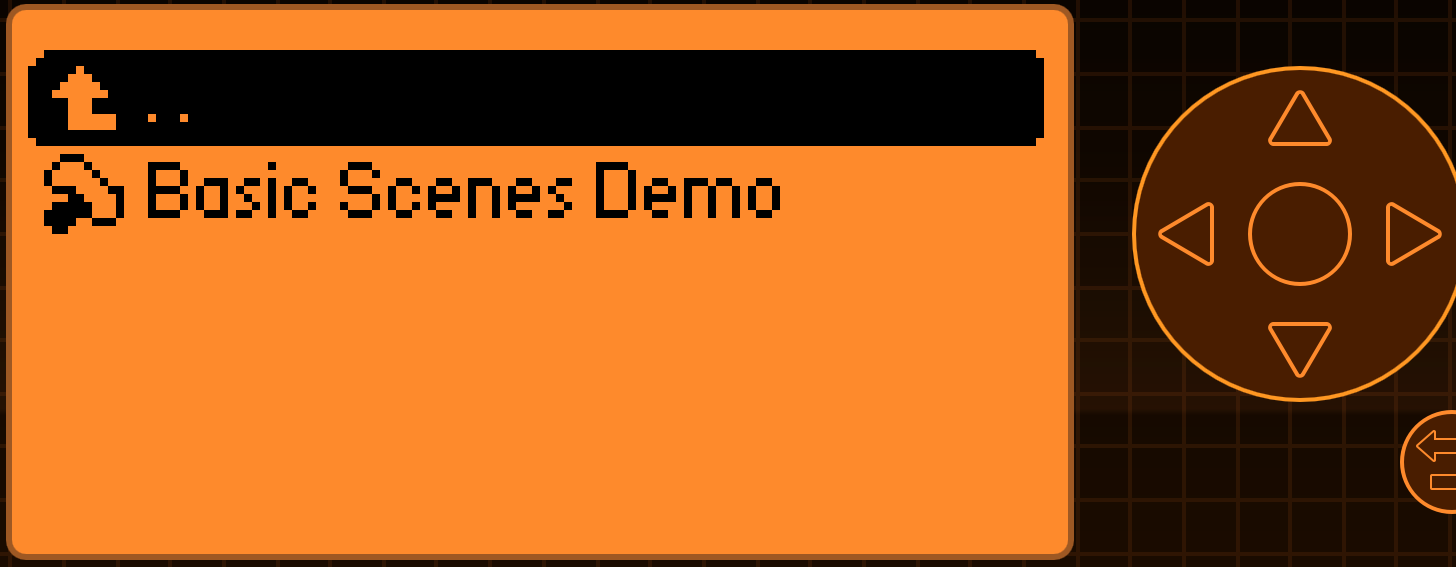
When the program exits, it will now be installed on the Flipper. You can see the application on the Flipper Zero under Applications, then Misc, then Basic Scenes Demo. Congratulations, you have created a Flipper Zero application!
Troubleshooting:
-
If you get "Could not open com port" error, you need to confirm that the Flipper is connected to your computer and that you are not running the Flipper UI, qFlipper or lab.flipper.net.
-
If you get "****** FBT ERRORS ******" error, you need to ensure that your code and application.fam matches the code from the previous steps.
Step 9. Create an enum for the scenes.
Remember that we are creating a basic scenes application with four scenes:
- BasicScenesMainMenuScene - The main menu scene.
- BasicScenesLotteryScene - The lottery number generator scene.
- BasicScenesGreetingInputScene - The greeting name input scene.
- BasicScenesGreetingMessageScene - The greeting message scene.
Add the following lines below the #include statements in the basic_scenes.c file:
typedef enum {
    BasicScenesMainMenuScene,
    BasicScenesLotteryScene,
    BasicScenesGreetingInputScene,
    BasicScenesGreetingMessageScene,
    BasicScenesSceneCount,
} BasicScenesScene;
The values of the enum are the scene numbers, starting with 0. The BasicScenesSceneCount is equal to the number of scenes in the application (4).
Step 10. Crete an enum for referencing the module's views.
Remember that we have three module's views:
- BasicScenesSubmenuView - The submenu's view.
- BasicScenesWidgetView - The widget's view.
- BasicScenesTextInputView - The text_input's view.
Add the following lines after the BasicScenesScene in the basic_scenes.c file:
typedef enum {
    BasicScenesSubmenuView,
    BasicScenesWidgetView,
    BasicScenesTextInputView,
} BasicScenesView;
Step 11. Include the scene manager and view dispatcher headers.
Add the following lines to the top of the basic_scenes.c file: (Add the lines immediately after the #include <furi.h> line)
#include <gui/gui.h>
#include <gui/view_dispatcher.h>
#include <gui/scene_manager.h>
#include <gui/modules/widget.h>
#include <gui/modules/submenu.h>
#include <gui/modules/text_input.h>
This includes code for the various GUI components that we will use in our application.
Step 12. Create an App object.
Add the following lines after the BasicScenesView in the basic_scenes.c file:
typedef struct App {
    SceneManager* scene_manager;
    ViewDispatcher* view_dispatcher;
    Submenu* submenu;
    Widget* widget;
    TextInput* text_input;
} App;
This creates an App object that will hold the scene manager, view dispatcher, and the three GUI modules that we will use in our application.
Step 13. Create stub functions for all of our scenes.
Remember that we are creating a basic scenes application with four scenes:
- BasicScenesMainMenuScene - The main menu scene.
- BasicScenesLotteryScene - The lottery number generator scene.
- BasicScenesGreetingInputScene - The greeting name input scene.
- BasicScenesGreetingMessageScene - The greeting message scene.
Each scene will have an on_enter, on_event and on_exit function. We will create stub functions for each of these functions. Later in the tutorial we will add code to these functions.
Add the following lines after the App typedef in the basic_scenes.c file:
void basic_scenes_main_menu_scene_on_enter(void* context) {
  UNUSED(context);
}
bool basic_scenes_main_menu_scene_on_event(void* context, SceneManagerEvent event) {
  UNUSED(context);
  UNUSED(event);
  return false; // event not handled.
}
void basic_scenes_main_menu_scene_on_exit(void* context) {
  UNUSED(context);
}

void basic_scenes_lottery_scene_on_enter(void* context) {
  UNUSED(context);
}
bool basic_scenes_lottery_scene_on_event(void* context, SceneManagerEvent event) {
  UNUSED(context);
  UNUSED(event);
  return false; // event not handled.
}
void basic_scenes_lottery_scene_on_exit(void* context) {
  UNUSED(context);
}

void basic_scenes_greeting_input_scene_on_enter(void* context) {
  UNUSED(context);
}
bool basic_scenes_greeting_input_scene_on_event(void* context, SceneManagerEvent event) {
  UNUSED(context);
  UNUSED(event);
  return false; // event not handled.
}
void basic_scenes_greeting_input_scene_on_exit(void* context) {
  UNUSED(context);
}

void basic_scenes_greeting_message_scene_on_enter(void* context) {
  UNUSED(context);
}
bool basic_scenes_greeting_message_scene_on_event(void* context, SceneManagerEvent event) {
  UNUSED(context);
  UNUSED(event);
  return false; // event not handled.
}
void basic_scenes_greeting_message_scene_on_exit(void* context) {
  UNUSED(context);
}
Step 14. Create an array of our on_enter handlers.
Create an array of our on_enter handlers. The order of the scenes should be the same order as defined in the BasicScenesScene enum (main menu, lottery, greeting input, greeting message).
Add the following lines after the stub functions in the basic_scenes.c file:
void (*const basic_scenes_scene_on_enter_handlers[])(void*) = {
    basic_scenes_main_menu_scene_on_enter,
    basic_scenes_lottery_scene_on_enter,
    basic_scenes_greeting_input_scene_on_enter,
    basic_scenes_greeting_message_scene_on_enter,
};
Step 15. Create an array of our on_event handlers.
Create an array of our on_event handlers. The order of the scenes should be the same order as defined in the BasicScenesScene enum.
Add the following lines after the scene_on_enter_handlers array in the basic_scenes.c file:
bool (*const basic_scenes_scene_on_event_handlers[])(void*, SceneManagerEvent) = {
    basic_scenes_main_menu_scene_on_event,
    basic_scenes_lottery_scene_on_event,
    basic_scenes_greeting_input_scene_on_event,
    basic_scenes_greeting_message_scene_on_event,
};
Step 16. Create an array of our on_exit handlers.
Create an array of our on_exit handlers. The order of the scenes should be the same order as defined in the BasicScenesScene enum.
Add the following lines after the scene_on_event_handlers array in the basic_scenes.c file:
void (*const basic_scenes_scene_on_exit_handlers[])(void*) = {
    basic_scenes_main_menu_scene_on_exit,
    basic_scenes_lottery_scene_on_exit,
    basic_scenes_greeting_input_scene_on_exit,
    basic_scenes_greeting_message_scene_on_exit,
};
Step 17. Create a scene manager handlers object.
The scene manager handlers object will be used to initialize the scene manager. The scene_num field should be set to the number of scenes in our application, which is defined as 4 by the BasicScenesSceneCount enum.
Add the following lines after the scene_on_exit_handlers array in the basic_scenes.c file:
static const SceneManagerHandlers basic_scenes_scene_manager_handlers = {
    .on_enter_handlers = basic_scenes_scene_on_enter_handlers,
    .on_event_handlers = basic_scenes_scene_on_event_handlers,
    .on_exit_handlers = basic_scenes_scene_on_exit_handlers,
    .scene_num = BasicScenesSceneCount,
};
Step 18. Create a basic_scene_custom_callback function.
We will create a basic_scene_custom_callback function to handle the custom event. This function will be called when the custom event is received. Custom events can be invoked for various reasons, such as a timer, voltage changes on Flipper Zero pins, new data, or if a view decides to invoke a custom event (perhaps due to keypress or invalid data being entered). We will delegate our custom event handling to the scene manager's handle custom event routine. We will see examples of custom events in steps 28 & 36.
Add the following lines after the basic_scenes_scene_manager_handlers object in the basic_scenes.c file:
static bool basic_scene_custom_callback(void* context, uint32_t custom_event) {
    furi_assert(context);
    App* app = context;
    return scene_manager_handle_custom_event(app->scene_manager, custom_event);
}
Step 19. Create a scene_back_event_callback function.
We will create a scene_back_event_callback function to handle the back event. This function will be called when the back event is received due to the user clicking the BACK button. We will delegate our back event handling to the scene manager's handle back event routine.
Add the following lines after the basic_scene_custom_callback function in the basic_scenes.c file:
bool basic_scene_back_event_callback(void* context) {
    furi_assert(context);
    App* app = context;
    return scene_manager_handle_back_event(app->scene_manager);
}
Step 20. Create an app_alloc function.
We will create an app_alloc function to allocate memory for our application. This function will allocate memory for the scene manager, view dispatcher, submenu, widget and text input. The scene manager will be initialized with the scene manager handlers object we created in step 17. We also add the views for the submenu, widget and text input to the view dispatcher, so they can be referenced by their enum values.
Add the following lines after the scene_manager_handlers object in the basic_scenes.c file:
static App* app_alloc() {
    App* app = malloc(sizeof(App));
    app->scene_manager = scene_manager_alloc(
      &basic_scenes_scene_manager_handlers,
      app);
    app->view_dispatcher = view_dispatcher_alloc();
    view_dispatcher_enable_queue(app->view_dispatcher);
    view_dispatcher_set_event_callback_context(app->view_dispatcher, app);
    view_dispatcher_set_custom_event_callback(app->view_dispatcher, basic_scene_custom_callback);
    view_dispatcher_set_navigation_event_callback(
        app->view_dispatcher, basic_scene_back_event_callback);
    app->submenu = submenu_alloc();
    view_dispatcher_add_view(
        app->view_dispatcher,
        BasicScenesSubmenuView,
        submenu_get_view(app->submenu));
    app->widget = widget_alloc();
    view_dispatcher_add_view(
        app->view_dispatcher,
        BasicScenesWidgetView,
        widget_get_view(app->widget));
    app->text_input = text_input_alloc();
    view_dispatcher_add_view(
        app->view_dispatcher,
        BasicScenesTextInputView,
        text_input_get_view(app->text_input));
    return app;
}
The app_alloc function does the following:
- Create an app object and allocate memory for it.
- Create a scene manager object and allocate memory for it.
- Create a view dispatcher object and allocate memory for it.
- Enable the view dispatcher queue to handle events.
- Set the event callback context for the view dispatcher.
- Set the custom event callback for the view dispatcher.
- Set the navigation event callback for the view dispatcher (back event).
- Create a submenu object and allocate memory for it.
- Add the submenu view to the view dispatcher.
- Create a widget object and allocate memory for it.
- Add the widget view to the view dispatcher.
- Create a text input object and allocate memory for it.
- Add the text input view to the view dispatcher.
- Return the app object.
In the future, you can add more views to the view dispatcher and allocate memory for their modules in the app_alloc function.
Step 21. Create an app_free function.
We will create an app_free function to free memory allocated for our application. This function will free memory allocated for the scene manager, view dispatcher, submenu, widget and text input.
Add the following lines after the app_alloc function in the basic_scenes.c file:
static void app_free(App* app) {
    furi_assert(app);
    scene_manager_free(app->scene_manager);
    view_dispatcher_free(app->view_dispatcher);
    submenu_free(app->submenu);
    widget_free(app->widget);
    text_input_free(app->text_input);
    free(app);
}
Step 22. Update the program entry point.
Replace the basic_scenes_app function with the following code:
int32_t basic_scenes_app(void* p) {
    UNUSED(p);
    App* app = app_alloc();

    Gui* gui = furi_record_open(RECORD_GUI);
    view_dispatcher_attach_to_gui(
      app->view_dispatcher,
      gui,
      ViewDispatcherTypeFullscreen);
    scene_manager_next_scene(
      app->scene_manager,
      BasicScenesMainMenuScene);
    view_dispatcher_run(app->view_dispatcher);

    app_free(app);
    return 0;
}
This code does the following:
- Allocate memory for the app object.
- Give us a copy of the GUI object.
- Attach the view dispatcher to the GUI.
- Navigate to the main menu scene.
- Run the view dispatcher (which won't return until the user presses BACK enough times to exit the application).
- Free memory allocated for the app object.
- Return 0 to indicate successful exit.
Step 23. Create a stub menu callback function.
We will create a stub menu callback function. This function will be called when a menu item is selected. In the future, we will update this function to fire a custom event to navigate to the next scene.
Add the following lines before the basic_scenes_main_menu_scene_on_enter function in the basic_scenes.c file:
void basic_scenes_menu_callback(void* context, uint32_t index) {
    UNUSED(context);
    UNUSED(index);
}
Step 24. Update basic_scenes_main_menu_scene_on_enter function.
Replace the basic_scenes_main_menu_scene_on_enter function with the following code:
void basic_scenes_main_menu_scene_on_enter(void* context) {
    App* app = context;
    submenu_reset(app->submenu);
    submenu_set_header(app->submenu, "Basic Scenes Demo");
    submenu_add_item(app->submenu, "Lotto Numbers", 0, basic_scenes_menu_callback, app);
    submenu_add_item(app->submenu, "Greeting", 1, basic_scenes_menu_callback, app);
    view_dispatcher_switch_to_view(app->view_dispatcher, BasicScenesSubmenuView);
}
The code does the following:
- Reset the submenu.
- Set the header of the submenu to "Basic Scenes Demo".
- Add a menu item with the text "Lotto Numbers" and the index 0.
- Add a menu item with the text "Greeting" and the index 1.
Step 25. Compile and run the application.
Run the following command from the root of the firmware folder to compile and run the application. Make sure you are not currently running the Flipper UI, qFlipper or lab.flipper.net. In some environments you do not need the "./" at the beginning of the command.
cd <your working directory>
cd official-firmware
./fbt launch_app APPSRC=applications_user/basic_scenes
You should see your application's main menu on the Flipper! You can use the UP/DOWN buttons on the Flipper Zero to switch your selection. Press the BACK button to exit the application.
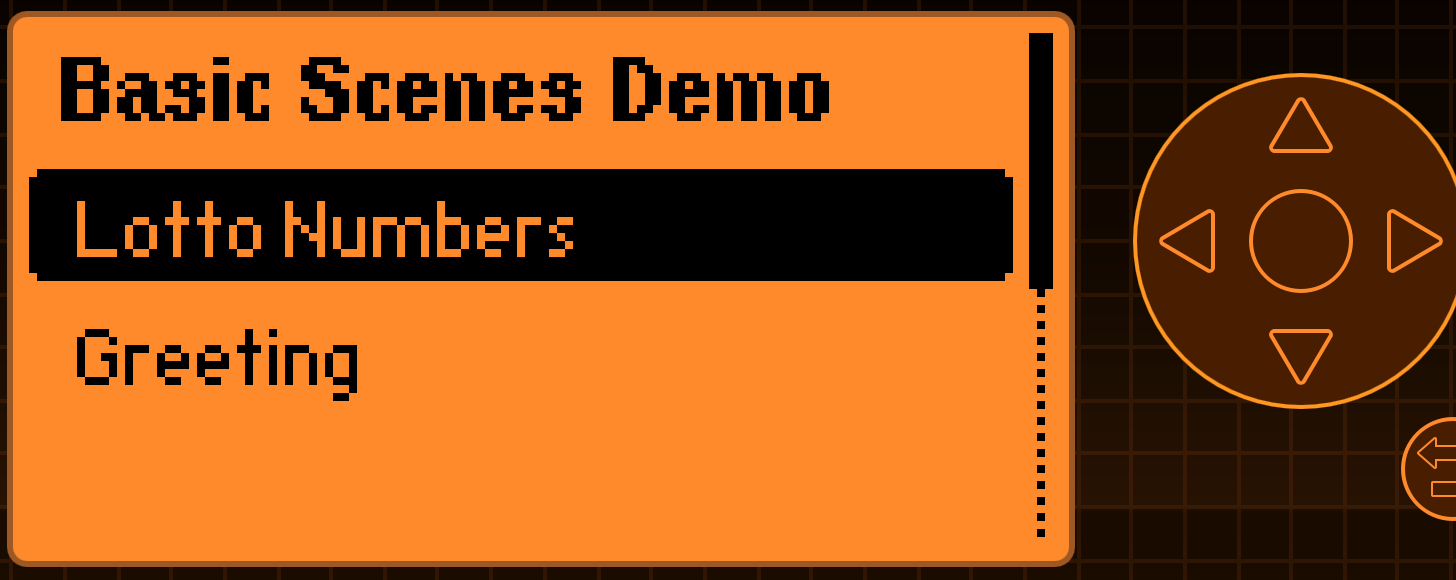
Congratulations, your Flipper Zero application now has a menu!
Step 26. Create an enum with menu item indexes.
We will create an enum with menu item indexes. This will allow us to reference menu items by their enum values instead of using magic numbers (using "BasicScenesMainMenuSceneGreeting" instead of "1" in our code makes it easier to understand).
Add the following lines before the basic_scenes_menu_callback function in the basic_scenes.c file:
typedef enum {
    BasicScenesMainMenuSceneLottoNumbers,
    BasicScenesMainMenuSceneGreeting,
} BasicScenesMainMenuSceneIndex;
Step 27. Update the menu callback function.
Replace the basic_scenes_main_menu_scene_on_enter function's add_item with the enum values instead of magic numbers. The method should look like this:
void basic_scenes_main_menu_scene_on_enter(void* context) {
    App* app = context;
    submenu_reset(app->submenu);
    submenu_set_header(app->submenu, "Basic Scenes Demo");
    submenu_add_item(
      app->submenu,
      "Lotto Numbers",
      BasicScenesMainMenuSceneLottoNumbers,
      basic_scenes_menu_callback,
      app);
    submenu_add_item(
      app->submenu,
      "Greeting",
      BasicScenesMainMenuSceneGreeting,
      basic_scenes_menu_callback,
      app);
    view_dispatcher_switch_to_view(app->view_dispatcher, BasicScenesSubmenuView);
}
The code does the following:
- Reset the submenu.
- Set the header of the submenu to "Basic Scenes Demo".
- Add a menu item with the text "Lotto Numbers" and the index BasicScenesMainMenuSceneLottoNumbers (value 0).
- Add a menu item with the text "Greeting" and the index BasicScenesMainMenuSceneGreeting (value 1).
Step 28. Create an enum with custom events from the main menu.
The next step is to create an enum with custom events from the main menu. This will allow us to reference custom events by their enum values instead of using magic numbers.
Add the following lines after the BasicScenesMainMenuSceneIndex in the basic_scenes.c file:
typedef enum {
    BasicScenesMainMenuSceneLottoNumbersEvent,
    BasicScenesMainMenuSceneGreetingEvent,
} BasicScenesMainMenuEvent;
Step 29. Update the basic_scenes_menu_callback function.
Update the basic_scenes_menu_callback function to fire a custom event when a menu item is selected. The custom event will trigger our scenes on_event function.
Replace the basic_scenes_menu_callback function with the following code:
void basic_scenes_menu_callback(void* context, uint32_t index) {
    App* app = context;
    switch(index) {
    case BasicScenesMainMenuSceneLottoNumbers:
        scene_manager_handle_custom_event(
            app->scene_manager,
            BasicScenesMainMenuSceneLottoNumbersEvent);
        break;
    case BasicScenesMainMenuSceneGreeting:
        scene_manager_handle_custom_event(
            app->scene_manager,
            BasicScenesMainMenuSceneGreetingEvent);
        break;
    }
}
The code does the following:
- When the menu item with the index BasicScenesMainMenuSceneLottoNumbers is selected, the function fires the BasicScenesMainMenuSceneLottoNumbersEvent custom event.
- When the menu item with the index BasicScenesMainMenuSceneGreeting is selected, the function fires the BasicScenesMainMenuSceneGreetingEvent custom event.
- These custom events will be handled in the basic_scenes_main_menu_scene_on_event function, which we update in the next step.
Step 30. Update the basic_scenes_main_menu_scene_on_event function.
Update the basic_scenes_main_menu_scene_on_event function to handle the custom events from the main menu. The function will navigate to the next scene when a custom event is received. The function should look like this:
bool basic_scenes_main_menu_scene_on_event(void* context, SceneManagerEvent event) {
    App* app = context;
    bool consumed = false;
    switch(event.type) {
    case SceneManagerEventTypeCustom:
        switch(event.event) {
        case BasicScenesMainMenuSceneLottoNumbersEvent:
            scene_manager_next_scene(app->scene_manager, BasicScenesLotteryScene);
            consumed = true;
            break;
        case BasicScenesMainMenuSceneGreetingEvent:
            scene_manager_next_scene(app->scene_manager, BasicScenesGreetingInputScene);
            consumed = true;
            break;
        }
        break;
    default:
        break;
    }
    return consumed;
}
The code does the following:
- When the BasicScenesMainMenuSceneLottoNumbersEvent custom event is received, the function navigates to the BasicScenesLotteryScene scene.
- When the BasicScenesMainMenuSceneGreetingEvent custom event is received, the function navigates to the BasicScenesGreetingInputScene scene.
- The function returns true if the event was consumed, otherwise it returns false.
Step 31. Update the basic_scenes_main_menu_scene_on_exit function.
Update the basic_scenes_main_menu_scene_on_exit function to reset the submenu, so we aren't consuming additional resources. The function should look like this:
void basic_scenes_main_menu_scene_on_exit(void* context) {
    App* app = context;
    submenu_reset(app->submenu);
}
Step 32. Update the basic_scenes_lottery_scene_on_enter function.
Update the basic_scenes_lottery_scene_on_enter function to use a widget to display hardcoded lotto numbers. The function should look like this:
void basic_scenes_lottery_scene_on_enter(void* context) {
    App* app = context;
    widget_reset(app->widget);
    widget_add_string_element(
        app->widget, 25, 15, AlignLeft, AlignCenter, FontPrimary, "Lotto numbers:");
    widget_add_string_element(
        app->widget, 30, 35, AlignLeft, AlignCenter, FontBigNumbers, "0 4 2");
    view_dispatcher_switch_to_view(app->view_dispatcher, BasicScenesWidgetView);
}
The code does the following:
- Resets the widget.
- Adds a string element with the text "Lotto numbers:" at position (25, 15).
- Adds a string element with the text "0 4 2" at position (30, 35).
- Switches to the widget view.
Step 33. Compile and run the application.
Run the following command from the root of the firmware folder to compile and run the application. Make sure you are not currently running the Flipper UI, qFlipper or lab.flipper.net. In some environments you do not need the "./" at the beginning of the command.
cd <your working directory>
cd official-firmware
./fbt launch_app APPSRC=applications_user/basic_scenes
The application should launch the main menu, with options for Lotto Numbers and Greeting. Select the 'Lotto numbers' menu item and click the OK button on the Flipper Zero. The application should show the lotto numbers screen:
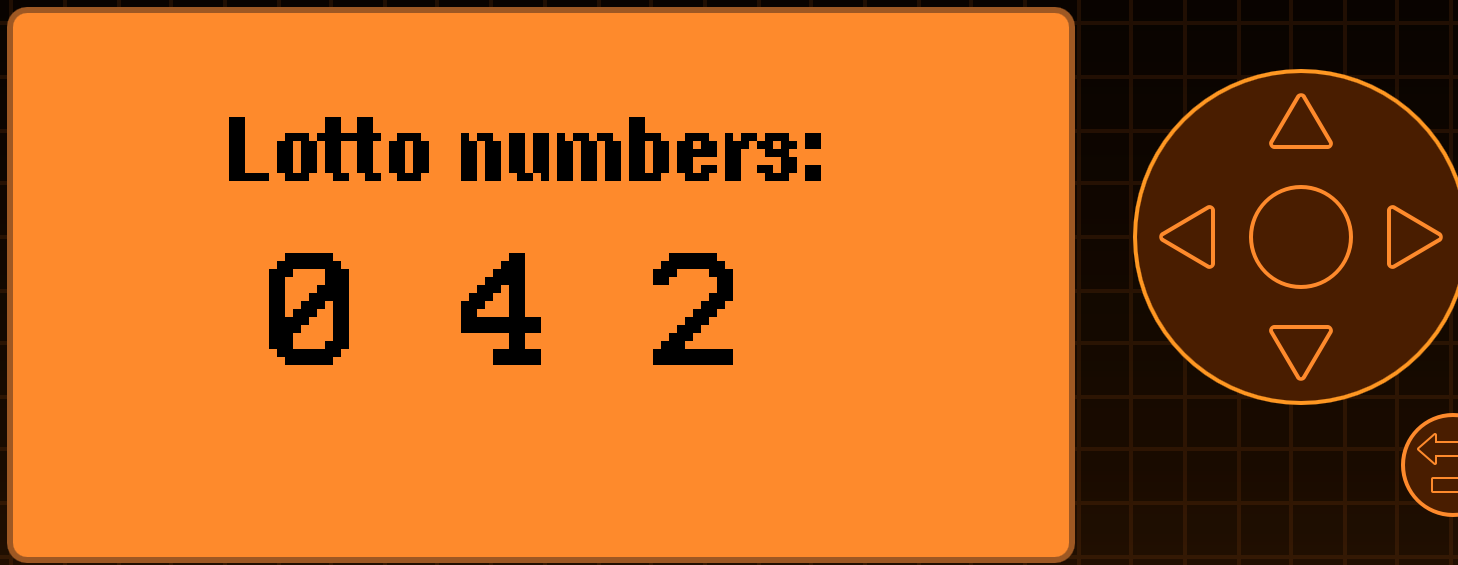
Click the BACK button on the Flipper Zero to return to the main menu. Click the BACK button again to exit the application.
Congratulations, your Flipper Zero application can display a lottery number guess! It's https://xkcd.com/221/ all over again!
Step 34. Add a buffer to the App struct.
In the next five steps, we are going to create the code to prompt the user for their name and store their response in a buffer. The order of the steps is somewhat backwards, so that future steps can reference the code from previous steps.
Add a buffer (user_name) to the App struct. The buffer will be used to store the user's name. We will also add a variable (user_name_size) to indicate the maximum size of the buffer. Update the App struct in the basic_scenes.h file:
typedef struct App {
    SceneManager* scene_manager;
    ViewDispatcher* view_dispatcher;
    Submenu* submenu;
    Widget* widget;
    TextInput* text_input;
    char* user_name;
    uint8_t user_name_size;
} App;
Step 35. Update the app_alloc function.
Update the app_alloc function to allocate the buffer for the user's name. For this example, we will set the maximum length to 16 characters. The beginning of function should look like this:
static App* app_alloc() {
    App* app = malloc(sizeof(App));
    app->user_name_size = 16;
    app->user_name = malloc(app->user_name_size);
    app->scene_manager = scene_manager_alloc(
        &basic_scenes_scene_manager_handlers, app);
Step 36. Create an enum for the greeting input scene's custom event.
We will trigger the custom event when the user has completed entering their name. The BasicScenesGreetingInputEvent enum should be defined after BasicScenesMainMenuEvent in the basic_scenes.h file:
typedef enum {
    BasicScenesGreetingInputSceneSaveEvent,
} BasicScenesGreetingInputEvent;
Step 37. Create a text_input_callback function.
The text_input_callback function will be called when the user has finished entering their name. The function can be added before basic_scenes_greeting_input_scene_on_enter and should look like this:
void basic_scenes_text_input_callback(void* context) {
    App* app = context;
    scene_manager_handle_custom_event(app->scene_manager,
       BasicScenesGreetingInputSceneSaveEvent);
}
Step 38. Update the basic_scenes_greeting_input_scene_on_enter function.
Update the basic_scenes_greeting_input_scene_on_enter function to use a text input to get the user's name. The function should look like this:
void basic_scenes_greeting_input_scene_on_enter(void* context) {
    App* app = context;
    bool clear_text = true;
    text_input_reset(app->text_input);
    text_input_set_header_text(app->text_input, "Enter your name");
    text_input_set_result_callback(
        app->text_input,
        basic_scenes_text_input_callback,
        app,
        app->user_name,
        app->user_name_size,
        clear_text);
    view_dispatcher_switch_to_view(app->view_dispatcher, BasicScenesTextInputView);
}
The code does the following:
- Resets the text input.
- Sets the header text to "Enter your name".
- Sets the result callback to basic_scenes_text_input_callback (with a context of app).
- Sets the result buffer to app->user_name.
- Sets the maximum size of the result buffer to app->user_name_size.
- Clears the input buffer if the user has already entered text.
- Switches to the text input view.
Step 39. Update the basic_scenes_greeting_input_scene_on_event function.
Update the basic_scenes_greeting_input_scene_on_event function to handle the custom event we created in the previous step. The function should look like this:
bool basic_scenes_greeting_input_scene_on_event(void* context, SceneManagerEvent event) {
    App* app = context;
    bool consumed = false;
    if(event.type == SceneManagerEventTypeCustom) {
        if(event.event == BasicScenesGreetingInputSceneSaveEvent) {
            scene_manager_next_scene(app->scene_manager, BasicScenesGreetingMessageScene);
            consumed = true;
        }
    }
    return consumed;
}
The code does the following:
- Checks if the event is a custom event.
- Checks if the event is BasicScenesGreetingInputSceneSaveEvent.
- Switches to the greeting message scene.
Step 40. Update the basic_scenes_greeting_message_scene_on_enter function.
Update the basic_scenes_greeting_message_scene_on_enter function to display the greeting to the user. The function should look like this:
void basic_scenes_greeting_message_scene_on_enter(void* context) {
    App* app = context;
    widget_reset(app->widget);
    FuriString* message = furi_string_alloc();
    furi_string_printf(message, "Hello,\n%s!", app->user_name);
    widget_add_string_multiline_element(
        app->widget, 5, 15, AlignLeft, AlignCenter, FontPrimary,
        furi_string_get_cstr(message));
    furi_string_free(message);
    view_dispatcher_switch_to_view(app->view_dispatcher, BasicScenesWidgetView);
}
The code does the following:
- Resets the widget.
- Creates a new FuriString.
- Formats the string with a greeting and the user's name.
- Adds the string to the widget.
- Frees the FuriString.
- Switches to the widget view.
Step 41. Update the basic_scenes_greeting_message_scene_on_exit function.
Update the basic_scenes_greeting_message_scene_on_exit function to reset the widget. The function should look like this:
void basic_scenes_greeting_message_scene_on_exit(void* context) {
    App* app = context;
    widget_reset(app->widget);
}
Step 42. Run the final program!
Run the following command from the root of the firmware folder to compile and run the application. Make sure you are not currently running the Flipper UI, qFlipper or lab.flipper.net. In some environments you do not need the "./" at the beginning of the command.
cd <your working directory>
cd official-firmware
./fbt launch_app APPSRC=applications_user/basic_scenes
The application should launch the main menu, with options for Lotto Numbers and Greeting. Select the 'Greeting' menu item and click the OK button on the Flipper Zero. The application should prompt for your name:
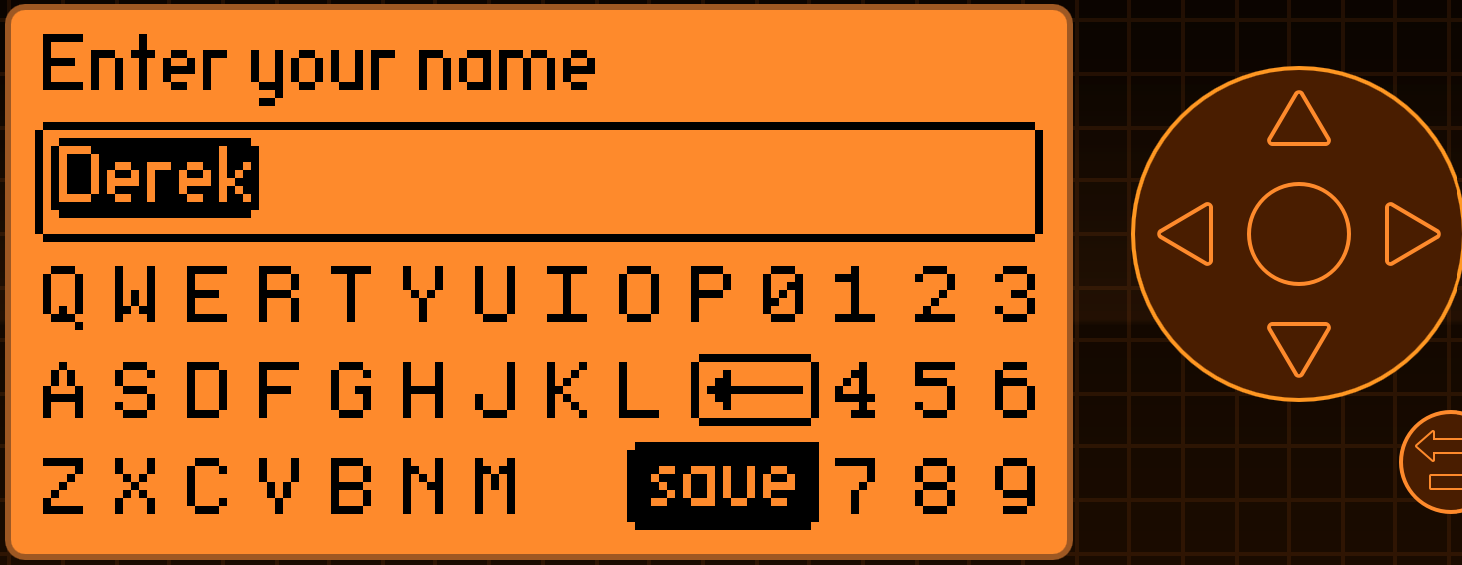
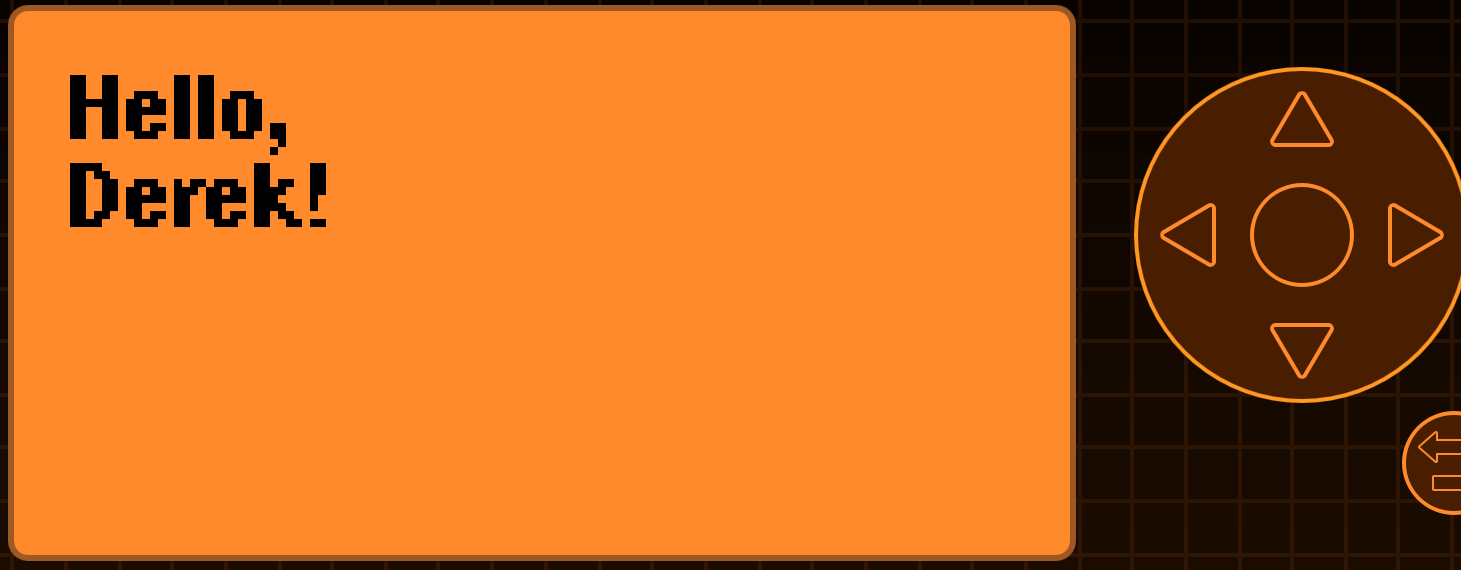
Enter your name and then select the save keyboard option. The application should display a greeting message with your name:
Congratulations! You have successfully created a Flipper Zero application using Scene Manager!
